A while ago, i got asked by Daisy over at Born pretty Store to do a review. It went really well so she has asked me to review a couple more nail art products! Yay!! I chose these Nail Stickers for today's review.


It has all the instructions on the back but i didn't really follow them that closely. If you follow what i did, it'll be fine =)

You'll need a small cup of water, the design you want to use and scissors to cut said design from the sheet. There is a plastic film over the sheet which you can remove before cutting up into little nail sized pieces (but not before cutting the whole design from the full sheet, as you'll need the clear sheet to protect the rest while your not using them)

~~~~~~~~~~~~~~~~~~~~~~~~~~~
1) Start with painting your nails with your chosen colour(s). I used Ulta3 Lilac Bloom and Soft Hydrangea as my base colours for this nail art design.


2) Dip one of the pieces of paper with the design on it, into the water for about 10 seconds.


3) Pull it out of the water and quickly dip your nail into the water to get it a bit wet.

5) Pull your finger out and stick the paper, design side down, onto your nail. Try and get it into place straight away, it will take literally 2 seconds for the design to stick to your nail. Once it's on your nail you can't move it around, and if your not careful it'll end up like the below pic lol. If you do get it in place and your happy with it, you can gently blow on it to help it dry faster.
This was my first go.


......and like this one.
It takes a few go's to get used to it but it is simple as!! Don't worry about the bits hanging over the edges etc. We will clean them up later =)

6) Repeat for all nails. Don't worry too much about small wrinkles etc. once you put a top coat on i found the really small wrinkles are not noticeable.

7) Clean up by filing the free edge very gently by using small downward strokes (not across like when you file your nails)

8) You can either keep filing all the way around if your comfortable doing that (like above) or you can get out your acetone and a small brush and clean up around the edges. The design just melts away very easily!

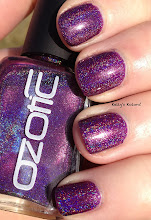
9) Add a topcoat to seal it in and protect it.
Notice the small wrinkles i had earlier are not visible now. Yay!


This wears just like normal nail polish would and doesn't chip etc any quicker than normal. I actually think it is quicker than getting your stamping kit out and if your like me, i can't get stamping right the first time. lol
The nail stickers can be bought from the Born Pretty Store for $4.73 per sheet which is cheap as, as it comes with so many different designs.
I also have a coupon code for all my readers, which gives you 10% off your entire order. They always have FREE shipping anywhere in the world!! =) Just enter the code "MLL91" into the coupon code area when you check out.

Products in this post provided for review.


Lovely!
ReplyDeleteLove the pandas!
ReplyDelete