Ads 468x60px

Sunday, March 31, 2013

Easter mani's + Light it up Blue in April for Autism!

Hi all!!
HAPPY EASTER!!

I hope everyone is having an awesome Easter and you got spoilt with lots of Easter eggs!!
I have been super busy this last week and haven't had a chance to do any Easter mani's =(
I haven't left you high and dry though. These are the three mani's i did last year for Easter!
Wow! They were so different back then!


Pretty pastel nails with Polka dots and a Bunny accent!


Little chicks


and matte Speckled Eggs!


Also next month is Autism awareness month with April 2nd being "World Autism Day". 


There is a bunch of awesome nail fans, bloggers, indie makers and well anyone who wants to, sharing awesome blue mani's for the cause! Some are doing it for just the day, one a week for the month and some doing it all month long.
I will be doing it month long. Not everyday but all my mani's for the month of April will be used with blue nail polish! Yay! 
Join in if you like! Whether it be blogging, IG, Facebook  link me up and i'll check it out!
IG hashtag: #bluenailsforautism & #lightitupbluenails

If you want more infomation on Autism, check out these links


Kel xx


Friday, March 29, 2013

Alanna Renee - Tranquil

Hi all!

I can't believe i waited so long to wear this polish! It is simply stunning! If you haven't got it, get it!!


Tranquil is described as a calming Turquoise filled with Lavender hex, small light blue and purple hex, large turquoise hex glitters and small indigo flakes.
I am so in love with this polish and will definitely be wearing it again soon!


Kel xx

Tuesday, March 26, 2013

Blog Sale!

Hi all!

Just a quick post letting you know i have updated my blog sale!
Link HERE or up in the blog sale tab!


Kel xx

Monday, March 25, 2013

Aussie Nails Monday - Blue!

Hi all!
Today's theme for Aussie nails Monday is blue! I came up with doing a simple framed nails dotticure.


I used my usual Ulta3 Lily White for the base colour for my ring fingers and thumbs. I used Ulta3 Calypso Holiday for the dots over the white and the base colour for all other nails. For the dots over CH i used Ulta3 Pacific Splash. I really wanted to matte-ify it but my matte top coat is all gross and gluggy and i'm waiting for ChG Matte magic to come in the post!


Let me know what you think!


Kel xx

Friday, March 22, 2013

Loony Lacquer - S'more Sandwich collection & review

Hi all!
I have some awesome polishes for you today! I was kindly given the S'more sandwich collection to review from Marie over at Marie's Manicure Madhouse and her brand of polish, Loony Lacquer.


Chocolate:


A beautiful bronzed Chocolate brown. Perfect to apply. This was two coats. It was almost a one coater and i think you could get away with one coat if you were careful or layering something over the top. Anyone who knows me by now, knows i love Choc brown polishes. This is no exception. I will be purchasing another bottle ;)


Marsh mellow Mash:


Marsh mellow mash is great for layering over Chocolate. It has a mix of shiny and matte silver glitters of Squares and hex's of various sizes and also a few larger sized holo hex's. This was two thin coats over "Chocolate" and application was easy.


Busicuit (biscuit?) Anyone:


Also layered over "Chocolate", Busicuit Anyone is made up of gold squares, smaller gold holo squares and bigger holo hex's suspended in a clear base. This was two thin coats and easy to apply.
I must add that the bigger squares are indeed flat and are not curled as they may appear on the nail. Looking at my bottle right now they are definitely flat =)


S'more Please:


S'more Please is a mix of everything above. The beautiful Chocolate base colour plus larger holo hex's,  gold squares and silver small hex glitters. It's awesome if you want a bit of everything above in one polish without having to layer it. This was two easy to apply coats.

If your a lover of brown polish like i am, you'll love these. These are available from April 1st on Marie's Etsy shop Loony Lacquer for $9 each which is a steal for awesome indies. As far as i can see these are only available in Australia.
You can also keep up to date with Loony Lacquer on their Facebook page with new releases and more swatches.


(Polishes in the post were sent for honest review.)


Kel xx

Monday, March 18, 2013

Aussie Nails Monday - Ombre

Hi everyone!

This weeks ANM is Ombre! I've never tried an Ombre before. I went with my favourite colour of course which is Brown.


I have a tonne of brown in my drawers so it was hard to pick some browns that were actually different enough and then also ones that would actually work in an Ombre. I think i did ok but i would have used a different shade another time for my middle finger.

I used all OPI polishes for this design.
Thumb: My boyfriend scales the walls. Obviously not a brown but i love Ombre's that start with white.
Index: Don't Pretzel my buttons
Middle: A-Taupe the Space Needle
Ring: You don't know Jacques
Pinky: Suzi loves Cowboys.


Kel xx

Saturday, March 16, 2013

Coastal Scents - Cosmic

Hi everyone! Just a quick one tonight. I bought this polish from a blog sale a good while ago and finally decided to give it a go!

This is Coastal Scents Cosmic.


Cosmic has awesome green to gold coloured flakies jam packed in a black base. I was surprised it turned out so well being all mixed up together rather than a clear flakie polish that you can put over black but it turned out awesome and not much is hidden. 
This was three coats. The lid/brush was awful to use though. It was almost too big to handle.


Kel xx

Tuesday, March 12, 2013

Colour block nails featuring The Natural Source Camouflage Colour!

I have collaborated with Lust Have It & The Natural Source to bring you a simple and easy nail art tutorial featuring The Natural Source nail polishes from their Camouflage collection.


I was kindly sent 8 of their polishes from their Camouflage Collection which came in this cool tin.


 Silver, Pink, Purple, Pumpkin, Purple Plum, Emerald, Blackened Brown, Black.


I have chosen to do use striping tape for my mani, but this can also be achieved by using normal sticky tape i'm sure you have at home, otherwise striping tape can be found on ebay for a couple of bucks for about 10 rolls. You'll probably never need that many but it can come in handy to throw in swaps and giveaways.


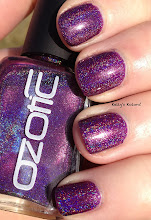
I used these 5 polishes from the collection to achieve today's look.
Pink, Purple, Pumpkin, Emerald, Blackened Brown.


This is my first pictorial so please be kind! =)


  1. Start of with a base colour. I used Pink. (it's more a nude with a hint of pink) A light colour is always best as a base as it won't show through the colours on the top.
  2. Apply a quick dry top coat and let dry
  3. While your nails are drying, cut the desired amount of pieces from the tape about 4-5cm in length, depending on how long your nails are, and place them along the corner of your work bench.
  4. Once your nails are dry, start applying the tape on each nail however you'd like.

5.  Grab your colours and start painting each different area a different colour. You may need a couple coats of each colour. Be careful not to paint over the tape and into the next area as it will show when the tape is removed.

You'll need to work a little fast and it's best to start out doing one nail at a time. It will get a bit messy up near and around your cuticles but this can be cleaned off later.


6.  Once you have the whole nail/all nails painted, pull off the striping tape. If you've overlapped the tape (like shown above where i have laid down the piece that goes from cuticle to the free edge, then the ones on the sides) make sure you take off the side pieces first before pulling off the one that's underneath or you'll end up with a ruined mani.


7.  Clean up around the cuticles with a small paintbrush dipped in acetone.


8.  Add a topcoat to help smooth it all out and make it nice and glossy.

That's it! Your done! =)

Very simple with minimal work.


The Natural Source and Lust Have It both have a special promotion for my awesome readers!

The Natural Source have 25% off their entire nail lacquer range and free shipping!!
Lacquers are normally $9.95 plus shipping so this is an awesome deal with them being $7.50 each with
free shipping. I'm not sure how long it lasts but i'd get on it quick!

Enter this code into the Promo box: lhi

You also get the free tin when you purchase 8 or more polishes!

http://www.thenaturalsource.com.au/Camouflage-Colour-3/Camouflage-Colour-Nail-Lacquers-187


Lust have It have an awesome promo too!
Enter the code "KOLORS" to receive $5 off your first months Woman's box. That means if you subscribe to a 6 month Women's box, you'll get $5 off your first month. There are monthly, 3 monthly, 6 monthly and Annual VIP Subscriptions available! There is also an Eco box available but is not included in this deal.
If your interested in subscribing go HERE and don't forget to enter the special promo code mentioned above. This code is valid until 31st March!


Products were provided for review.

Kel xx

Monday, March 11, 2013

Aussie nails Monday - Stripes: Easter pastel stripes

Monday again!!!
It doesn't feel like Monday. Today was a holiday here in South Australia so i spent the day inside in the air con swatching and doing this mani as it was 40 degrees outside today!


This weeks theme is Stripes.


I went with something pastel because i wanted to tie it in with Easter coming up soon. I really love what i came up. I really didn't want to take it off!


I started off with 5 of my favourite pastels from the Face of Australia collection, Pastels, which they released towards the end of last year. Post here.


 I used striping tape to achieve this look by taping off the parts i wanted to show through before using the same pastels, with a different colour on each nail. I also did varying widths on each nail.


Kel xx