Ads 468x60px

Thursday, October 31, 2013

Pretty Pots Polish review part 2

Hi all!

I have the second half of the awesome Pretty Pots Polish polishes to show today.
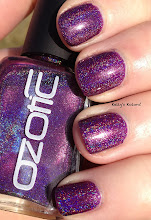

Grape Jam & Sugar


Grape Jam & Sugar has a light to medium purple base, with silver, pastel coloured and holo glitters, and purple micro glitters. This applied really well, i used two coats for photos, and one coat of quick dry top coat. A very pretty polish!


Pink Rainbows


Pink rainbows has a soft baby pink base with loads of shimmer and multi coloured hex glitter in different sizes. Reminds me a lot of Deborah lippmann Candy Shop, just not as jelly-ish. I used two coats for pictures. There is a teensy weensy bit of VNL still showing on some of my fingers but it didn't bother me at all. A third coat could be used but i loved it at 2 coats. One coat of quick dry top coat followed.


Euphoria.


This is probably my favourite out of all the ones i got for review. I am just loving orange, yellow and black all together at the moment. Definitely reminds me of Halloween and the american season of "Fall" even though its Spring here and we are heading into Summer :P
Euphoria is a glitter topper. Clear base with Orange and yellow glitters in hex and square, in different sizes and black bar glitter.
I layered this over different colours to see what it'd look like. My favourite is definitely over white.
Index - Ulta3 Lily White, Middle - Ulta3 Earl Grey, Ring - Ulta3 Black Satin, Pinky - B Bloom Bahamas.
There are a lot of people out there that don't like bar glitter. I for one absolutely love it, but layering it over black like my ring finger will hide the bar glitter ;)

Pretty Pots Polish is available from Jalene's Etsy Store for $9.50 each. Grape jam & Sugar, & Pink Rainbows are available now. Euphoria will be available tomorrow (Nov 1st) and will be part of the colour riot collection, which will contain about 10-12 polishes..

 Keep up to date with Jalene:
Facebook: Pretty Pots Polish
IG: @prettypotspolish


Products provided for honest review

Kel xx

Tuesday, October 29, 2013

Pretty Pots Polish review Part 1

Hi all!!

I have an awesome new Aussie indie brand to show you today!
I was lucky enough to get 6 awesome shades to review. Today i will show you 3 of them

First up is Dreamless.


Dreamless is a soft sheer pastel white (if there is such a thing…. there is now! lol) It has an awesome flash of blue in it to give it a pearly white look. It is in no way streaking at all. It was absolutely wonderful to work with. I used three coats for photos. There was still a little bit of visible nail line, which actually didn't bother me at all, but you could always put a coat of white underneath to help, if NVL bothers you.


Next is Hydrangea Garden.


Hydrangea Garden has a beautiful lilac purple base with glitters of varying sizes and shapes, in purple, yellow gold and blue. This was two coats and one coat of quick dry top coat. The polish was really easy to work and i had no hassles with the glitters.

Both Hydrangea Garden & Dreamless are part of the Pastel love collection and are available now on her Etsy shop for $9.50 each.


Last up is Today i am fearless.
This is part of the Summer collection which is actually due out for release in a couple of days. I have another from this collection to show you tomorrow too. The collection will also release some christmas colours too.


Today i am fearless has a black crelly base with different sized red, silver & holographic glitters. It was too sheer for my personal liking, so i layered two coats over one coat of my go-to black, Ulta3 Black Satin. If you like a more glitter bomb type polish, this will build up on it's own in 3-4 coats. I then added one coat of my quick dry top coat.


Pretty Pots Polish is available from Jalene's Etsy Store for $9.50each. She also ships of out Australia.

Keep up to date with Jalene:
Facebook: Pretty Pots Polish
IG: @prettypotspolish

*Products provided for honest review


Kel xx

Monday, October 28, 2013

Born Pretty Store water decal review

Hi all!

Today i have these little cute doggy nail water stickers from Born Pretty Store to show you!


I started with painting my nails two coats of white. I used my trusty go-to white, Ulta3 Lily White.
I won't go through the whole process again with the water decals, as I've done a few now but this is the end result. I applied one coat of quick dry top coat over all my nails to seal in the design. 
These are a cute and easy nail art option.
If your interested in how you apply these, you can find it HERE and HERE, which goes into more detail.


These nail stickers can be found HERE directly, or you can find it on their website, along with lots of other designs. Don't forget to use my coupon code below for 10% off your order. BPS always have free worldwide shipping!


Product sent for honest review.


Kel xx


Thursday, October 24, 2013

Blog Sale!!

Hi all!
Just a quick post to let you know i am having a blog sale! LINKY LINK LINK or tab up top ^^

Aussie, and international welcome. 7 bottle max for shipping out of australia due to customs.
Email me what you'd like, first come first served.

Thanks =)

OMG Nail polish strips review - Sneakers

Hi all!

After two long months, i finally have my iMac back together and working! Yay! That means, i can get back into blogging a bit more, instead of waiting to use my fiancés computer all the time….


Anyway, today i have nail strips to show you. These were sent to me for review from OMG Nail Strips. I picked two designs that they kindly sent me, and today i will be showing you the sneaker ones, and how to apply them.


These come in a packet of 14, so there is a strip to fit all sizes of nails.

It also has all the instructions on the back of the packet. They're pretty straight forward, but super easy to use. These are actually my first nail strips i've ever used loll so this came in handy.


I opened the packet, took them out and began choosing which one would fit each of my nails. I laid them out below from pinky to thumb on my left, then thumb to pinky on my right.


 All the strips have a clear plastic sheet over the top of them to protect them, so you'll need to remove that. Then you just peel the "sticker" off the back of the backing paper.


Line it up as best you can, starting from the cuticle. They are a touch fiddle-y, but they feel like those window stickers that can take off and be reused again lol, so if you have trouble you can peel it off and start again or readjust.

Once you have it in position, smooth it out with your fingers and fold the excess down over the tip. I used a file, and very lightly "buffed" the excess off in the same way i would file my nails.

Repeat for all remaining nails.


I had a few tiny creases in mine that i just could not get out, but putting a coat of fast drying topcoat over the top helped to smooth it out.


You can purchase these sneaker design strips for $6.89, HERE, or any of their other designs, from their website, OMG Nail Strips. They have lots of designs to choose from, and some are as low as $2.99!

At the moment, they also have 2 deals on.
Deal 1) Pick any 4 designs for $20 - coupon code: 4PACK
Deal 2) Pick any 10 designs for $45  - coupon code: 10PACK

These come from the US, but they ship worldwide, with free postage on all orders! How awesome is that!! I will definitely be getting some of these with xmas coming up, where i have little time to do my nails!


Kel xx

Monday, October 14, 2013

Born Pretty Store review - Moustache water decals

Hi everyone!

Today i have these awesome moustache water decals from Born Pretty Store to show today.


These are a quick and easy way to do nail art. I have a quick tutorial on how to do them..

I started off with painting 2 coats of my base colour. I used OPI Don't Pretzel my Buttons.


I took the sheet of decals out of the packet and cut out the ones that i wanted to use.


It has instructions on the back of the packet, as to how to use them. I have used these before HERE. These are very similar.


I then took off the backing paper that came with these, and dipped them into a small dish of room temperature water.
I left it for about 30 seconds before removing them, i dipped my finger into the bowl of water to get it wet, then placed the decal straight on my nail like so.


All of the images on the sheet were back to front/the wrong way up. So i then, while it was still wet, i slid it off and turned it over. 

I left it there for another 30 seconds to start drying. I then dabbed it a bit with paper towel, to soak up the excess water.


I then repeated the steps for all 9 other nails. Then added one coat of top coat to seal it all in.


These decals can be found on the Born Pretty Store website, or directly HERE.
Don't forget when you check out, that you use my coupon code "MLL91" for 10% your entire order. BPS always have free worldwide shipping.


*product was provided for review

See you next time!

Kel xx

Thursday, October 10, 2013

Love Thy Polish - 2013 Halloween Duo


*sigh*

I was in such a rush to get away for the long weekend, that i didn't schedule my posts properly and they never went live! Doh!!

Anyway, here is today's post which was supposed to go live tuesday lol
It was supposed to be my witches mani for the halloween challenge, but because i'm not creative enough, i decided to skip it and show you these awesomeness' from Love Thy Polish!


These are her duo polishes for Halloween 2013.

The first one is Zombie Brains


Zombie Brains has grey crelly base with two different sizes magenta dots, small white glitters and black micro glitter scattered through. It applied easy in 3 coats on it's own. It can also be layered over a grey aswell.


Next up is Swamp Monster.


Swap Monster is a bright neon glitter topper. It has large neon green, small micro green and small black hexes. This was one thick/two thin coats over China Glaze Recycle. A small amount of fishing was required but it can help if you sit the bottle upside down for a few minutes before using. No top coat was used for either photo's.

These are available from Love Thy Polish as a duo for $17 for 12ml (also available as a duo in 8ml mini's for $13) They are also available separate for $10 each (12ml). Be quick as these are LE, so once they are gone, that is it!


Kel xx