Ads 468x60px

Friday, June 28, 2013

Nailene Couture Design nails & ultra tabs review.

Hi again!
Today, i have the second product from Nailene to review. Yesterday's post was on the Acrylic Kit, which you can see here.

If your not a fan of Acrylics, perhaps these are more your thing?
Nailene have come up with artificial nails with a couture design on them.


Contents of pack;
- 24 nails in 12 different sizes ( 2 of each size)
- Nail glue
- Small nail file
- a picky thing, for which i wasn't sure what it's use was lol


These are the tabs. Unfortunately, i cannot wear artificial nails at work, so i chose to use these over the glue as i could only wear these for one day =(

i picked out which nail would suit my natural nail better and lined them all up so i wouldn't get them mixed up.
I then got the tabs and picked which one would also suit my nail shape better. None of these go to the edges of the nail and really just sit in the middle, so don't be alarmed. I actually stuck them all on each nail before placing the couture design nails on.


Some nails fit better then others and if your between sizes, chose the bigger size and file it down a little bit at a time until you reach the desired size. I didn't do that with my thumb as you can see above. There is a small gap, but that is no fault of Nailene's. I actually have crooked cuticles (as i call it lol) I have that on both thumb nails and cannot do anything about it. Am i the only freak??

I loved the design on the ones i got. I really wish i could have worn these for longer as they looked amazing!
This design comes with the gold and black stripe on the left and the right so make sure you pick the right ones before you stick them on lol


These are a really great for a quick and easy mani. I will be using these when i go on holidays next to really try them out. The tabs are awesome! The only downside to the tabs are they don't fully stick to the nail and because the nail is a clearish pink, you can see the sticky marks underneath. That could just be my nails too. Everyone will be different.

These retail for $16.99 for a pack of 24. They only have a few designs on their website at the moment but they also have a lot from the other ranges including plain french mani design.

Nailene also have a promo at the moment where if you buy from their online website you get 30% off with the coupon code "LAUNCH30" Also there is free shipping if you spend $50 or more ANNNND you also get a free packet of the Ultra adhesive tabs i just reviewed.


Nailene couture design nails provided for honest review. Please see my disclosure policy for more info.

Kel xx

Nailene Acrylic kit review

I was lucky enough to be given a few products from Nailene recently to try out, wear and review. I was able to choose three products from them, and i will be reviewing the Acrylic kit first.

Before i show you my pics, i just want to let you know i am not a professional at doing acrylics, i've never actually done them in my life before, and my reasoning for trying this product was to get an accurate showing of how they would look and wear if any person walked into a supermarket or pharmacy and bought this kit.


This is the contents of the packet. You get;
- Acrylic Powder
- Acrylic Liquid
- Nail glue (for glueing the tips on)
- Brush
- Nail file
- Nail Tips


You get 40 tips in the pack. 20 White and 20 clear, and two sizes of each coloured tip. I chose to use the white and do a french mani.


These are my bare nails before and as you can see i have a small break in the corner of me index finger =(


I sorted all my nails out into the colour and then into the sizes. If you look underneath the nail at the tip, you'll see a number. The smaller the number the bigger the tip. 0 being the biggest and 9 being the smallest. You need to pick which one is the closest fit to your nails. I found in one or two nails i was in between the sizes so i picked the bigger one and filed down the side a little until it was where i wanted it.


Once you have worked out which tips fit, use the glue and put a small smear of it on the indented part of the tip. Put into place and hold for a few seconds. (sorry no pics, my partner wasn't around and i only have two hands :P )


lol The tips are so long! Usually nail techs would use a tip cutter to cut off the excess to how long or short you want your tips. I don't have a tip cutter and i certainly wasn't going to file them all down lol. I used my handy dandy nail/toe nail clippers. Work out how long you want your nails and leave a bit extra at the ends because you'll need to file down a little bit to tidy it up. You can have it any shape you want but i love my nails square.


Now it's time use the acrylic powder and liquid.
Sorry, there are no pics of me using acrylic, as there was no one around to help out with the camera.
Please read full instructions on how to use the acrylic and apply it to the nail...

Here is my finished product.
This is straight after applying the acrylic and letting it dry. I then filed it with a 240grit nail file (my own, not the one that was supplied, that was a bit small to use)


I then gave it a tiny buff using a buffing block and then gave it a coat of quick dry topcoat.


I think i did pretty well considering it was my first try at acrylics.
It was very easy to use and only took a nail or two to get used to applying the acrylic. My side walls are a little flared out but can be fixed with a file down the sides.

For removal, just soak them off with straight/pure acetone.

Overall, i really love this! I have seen these in shops before and been skeptical because i didn't think they would turn out ok or like i got them done at the salon, but i was wrong. I'm glad i got the chance to try these out and i would definitely buy this if i wanted to go back to acrylics or just wanted something different, These are great for a special occasion like; wedding, formal, weekend away, times when you can't do your nails or don't have time to do them.

I loved that they looked great and i can still paint and change my nail colour until i need the do them again. I love that i can do these at home for a lot cheaper than getting them done at the salon. I barely used anything from the kit and it would easily do 3-4 mani's depending on your nail length.
The only thing i didn't like about them was they took a while to do, it would come easier and quicker after a few times though. They also took ages to soak off (like with all acrylics) You also need to use non-acetone nail polish remover when changing colour.

The kit retails for $24-99 which is an awesome price because you do get a few manis out of one kit. I have spent $45 just to get an infill before and this would easily do 2-3.

Nailene also have a promo at the moment where if you buy from their online website you get 30% off with the coupon code "LAUNCH30" Also there is free shipping if you spend $50 or more ANNNND you also get a free packet of Ultra adhesive tabs, which i will be reviewing tomorrow.

I will leave you with a pic of them painted with Sinful Colours Innocent. Two coats with one coat of Cult nails Wicked Fast.


Nailene acrylic kit provided for honest review. Please see my disclosure policy for more info.


Kel xx

Wednesday, June 12, 2013

Born Pretty Store review - Earthquake nails!

Hi everyone!!

I have another product review from Born Pretty Store to show you.

I wanted to get something i had never tried before to do some nail art so i chose these Nail Art Polish Pens. I chose the pink one to use.

At first i really had no idea what to use it for so it sat there on my desk for a while, until recently i came across Earthquake nails! Umm, what an awesome idea and i'd never tried it before.


I used my normal base coat of duri, then painted half my nail blue and the other half black. I alternated the colours on each side with each nail but it really can be done anyway you want. It also doesn't have to be perfect as you are just going over the middle line anyway.


I then used one coat of Seche Vite and let it dry. I'm fairly impatient and knowing that i will be working with a pen, i let it dry overnight and did the rest of the design the next day.

With the lid on the nail polish pen, give it a good shake and let it sit for about 5 minutes to get rid of any air bubbles (learnt this the hard way) When you take the cap off, you'll notice the nail polish pen has a white tip, you need to "pump" the white tip onto some paper towel until the colour starts coming through. Then your ready to start the earthquake design.


Start at the base of the nail where the cuticle is and "zig zag" the pen over the two colours. Try to get the pens' lines as close together as you can, but try not to make it one big messy block like i did in the end. haha
You'll probably need to go back over it a couple times as it can be a little bit sheer, more so on the "tips" of the lines. Then when your happy, let it dry for about 5 minutes then add your quick dry top coat. I was a bit impatient and it shows in my pinky finger where i added my topcoat too soon haha


Nail Art pens can be found on Born Pretty Store website and come in a variety of colours. They retail for $5.99 each which is an absolute bargain when priced up against the likes of the Sally Hansen ones, which in Australia are about $15-$20 each.  I also have a discount code for all my readers to use too, which entitles you to 10% off your total purchase. You can enter "MLL91" in the coupon code section when checking out. Born Pretty ALWAYS have free shipping worldwide on all purchases! =)

Product provided for honest review


What do you think of the Earthquake type nails? Love it or hate it?

Kel xx

Monday, June 10, 2013

AN Monday - Pink!

Hi everyone!


Hope you had an awesome long weekend! I think that was all Aussie's except WA, so i hope you WA's had a good weekend and monday back at work, uni etc.
I was a bit sick all weekend, well actually i have been since Thursday night, and i'm not 100% still but I'm on the mend.
Even though i wasn't well, i did make a trip up to the Riverland here in SA with my partner, his parents and our two dogs. It was a nice day actually and it was good to get out of bed and the house.

Anyway, onto ANM! This weeks theme was "Pink" As i haven't been well, i haven't had much enthusiasm to do my nails and to actually come up with anything =(

I settled for pink with my favourite glitter topper, Sticks 'n Stones!


This is 3 coats of B collection by Bloom Hollywood which is an awesome bright pink. I then followed it by doing one coat of Coverband's Sticks 'n Stones, which has got to be probably my all-time favourite glitter topper! I have used it so much i need a back up - maybe two! haha


Enjoy your week!! Hopefully i can put together another post this week! haha

Kel xx

Thursday, June 6, 2013

Duri Coral Conquest & What a Keeper review

A little while ago i found out Duri did coloured nail polish. Now, we all know they do the famous  Rejuvacote which everyone raves about, including myself! But, they do colours! Lots of colours! Awesome colours! haha


Not long after i found of Duri did colours, i was contacted by Lust Have It to do a review on some Duri  & Pink Tiger products that were apart of their monthly sample box's recently.  If you missed my post on Miracote and Pink Tiger Lint free gauze's, click here. Along with those, i also got two awesome colours to try.


First up is Coral Conquest


Initially when i saw that i had received a coral, i sighed a little. Corals and i don't mix.....usually! This one however, loves me!!! I absolutely loved this on me and it has given me an oomph to try more corals out. I think it's more the pink/red leaning corals like this one that do it for my skin tone and not the usual orange type ones. Anyway, this is amazing!! Formula was awesome and easy to work with. This was three coats. It was a touch patchy so it definitely needed the third coat, but it was super manageable. One coat of seche vite followed.


Next is What a Keeper


Umm What a Keeper it is!! A dark blurple with a hint of blue shimmer. It was hard to capture the shimmer as it wasn't as noticeable on the nail as it was in the bottle, but it is there... a little. This was two coats. I really wanted to call this a one coater but it just wasn't quite there. Very slightly needed the second coat. I actually tried so hard to convince myself it was a one coater but i couldn't do it! haha One coat of seche vite followed. Again, formula on this was awesome! Very easy to work with and i barely needed clean up.


Pink Tiger stock Duri nail polishes for $18 a bottle on their online shop along with the products i reviewed last month


Pink Tiger also have a promotion at the moment, if you spend $50 or more you get a free Duri nail polish of your choice. You need to email them your proof of purchase for redemption to redemptions@pinktiger.com.au
Products were sent for review.

Also if you'd like to sign up to Lust Have It where you can get awesome samples like this in their month subscription box, you can sign up on their website HERE and if you punch in the code "KOLORS" you get $5 off your first months box! =)


Have a great day!

Kel xx

Monday, June 3, 2013

AN Monday - Hearts!

Hi all!

This week's AN Monday theme is "Hearts"


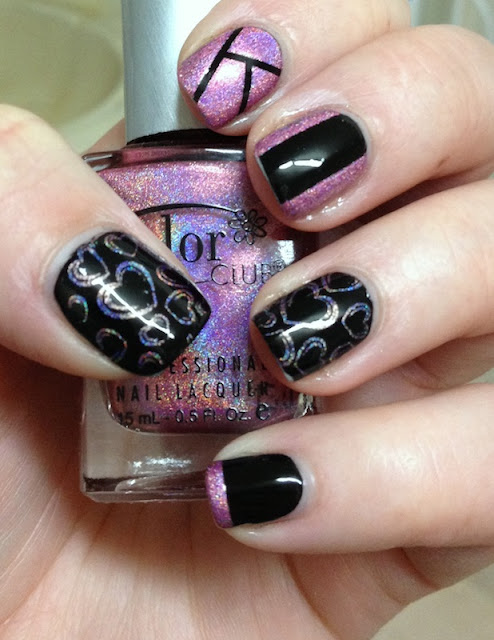
I have been wearing just plain black nail polish since Friday night as i had planned on doing some other nail art during the weekend, but hadn't gotten around to it. So i decided to just do my Hearts mani last night straight over the top.


On my thumb and ring finger, i stamped the hearts design from plate BM-317 (series 3 of the Bundle Monster set) with Color Club Miss Bliss. I then used striping tape and taped off the three other fingers in various ways, and used Miss Bliss again. It was mainly to cover the tip wear i had lol. I am not a fan of my index and middle finger. The pinky is passable but i had way too much polish on the brush. I think it could have come out better. I topped it all off with Konad special top coat, which i absolutely adore and have rekindled my love for! It's super fast drying and doesn't smudge.


There was no sun out this morning when i was taking photos so i resorted to taking a few in the bathroom under the fluro haha. Its about as good as i was going to get to see some holo today =(


Then when i left for work... the sun came out!! Doh!! lol


What do you think?

Have a great week!


Kel xx