Before i show you my pics, i just want to let you know i am not a professional at doing acrylics, i've never actually done them in my life before, and my reasoning for trying this product was to get an accurate showing of how they would look and wear if any person walked into a supermarket or pharmacy and bought this kit.


This is the contents of the packet. You get;
- Acrylic Powder
- Acrylic Liquid
- Nail glue (for glueing the tips on)
- Brush
- Nail file
- Nail Tips

You get 40 tips in the pack. 20 White and 20 clear, and two sizes of each coloured tip. I chose to use the white and do a french mani.

These are my bare nails before and as you can see i have a small break in the corner of me index finger =(

I sorted all my nails out into the colour and then into the sizes. If you look underneath the nail at the tip, you'll see a number. The smaller the number the bigger the tip. 0 being the biggest and 9 being the smallest. You need to pick which one is the closest fit to your nails. I found in one or two nails i was in between the sizes so i picked the bigger one and filed down the side a little until it was where i wanted it.

Once you have worked out which tips fit, use the glue and put a small smear of it on the indented part of the tip. Put into place and hold for a few seconds. (sorry no pics, my partner wasn't around and i only have two hands :P )

lol The tips are so long! Usually nail techs would use a tip cutter to cut off the excess to how long or short you want your tips. I don't have a tip cutter and i certainly wasn't going to file them all down lol. I used my handy dandy nail/toe nail clippers. Work out how long you want your nails and leave a bit extra at the ends because you'll need to file down a little bit to tidy it up. You can have it any shape you want but i love my nails square.


Now it's time use the acrylic powder and liquid.
Sorry, there are no pics of me using acrylic, as there was no one around to help out with the camera.
Please read full instructions on how to use the acrylic and apply it to the nail...
Here is my finished product.
This is straight after applying the acrylic and letting it dry. I then filed it with a 240grit nail file (my own, not the one that was supplied, that was a bit small to use)


I then gave it a tiny buff using a buffing block and then gave it a coat of quick dry topcoat.

I think i did pretty well considering it was my first try at acrylics.
It was very easy to use and only took a nail or two to get used to applying the acrylic. My side walls are a little flared out but can be fixed with a file down the sides.
For removal, just soak them off with straight/pure acetone.
Overall, i really love this! I have seen these in shops before and been skeptical because i didn't think they would turn out ok or like i got them done at the salon, but i was wrong. I'm glad i got the chance to try these out and i would definitely buy this if i wanted to go back to acrylics or just wanted something different, These are great for a special occasion like; wedding, formal, weekend away, times when you can't do your nails or don't have time to do them.
I loved that they looked great and i can still paint and change my nail colour until i need the do them again. I love that i can do these at home for a lot cheaper than getting them done at the salon. I barely used anything from the kit and it would easily do 3-4 mani's depending on your nail length.
The only thing i didn't like about them was they took a while to do, it would come easier and quicker after a few times though. They also took ages to soak off (like with all acrylics) You also need to use non-acetone nail polish remover when changing colour.
The kit retails for $24-99 which is an awesome price because you do get a few manis out of one kit. I have spent $45 just to get an infill before and this would easily do 2-3.
Nailene also have a promo at the moment where if you buy from their online website you get 30% off with the coupon code "LAUNCH30" Also there is free shipping if you spend $50 or more ANNNND you also get a free packet of Ultra adhesive tabs, which i will be reviewing tomorrow.
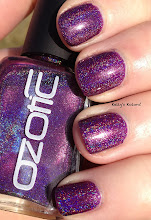
I will leave you with a pic of them painted with Sinful Colours Innocent. Two coats with one coat of Cult nails Wicked Fast.

Nailene acrylic kit provided for honest review. Please see my disclosure policy for more info.
Kel xx


Not bad Kel! You did pretty darn good for your first try! I was horrible at them when I first starting studying to become a nail tech but you did really well and doing a french tip is the easiest acrylic as well because you don't need to blend the tip to the natural nail either! P.s if you didn't already notice the nail polish will adhere to your acrylic nails so well! No chips wooooo lol
ReplyDelete