Ads 468x60px

Tuesday, April 30, 2013

Cate Ruby Silver mesh - review

Hi everyone!

Today is the last day of blue mani's for Autism Awareness! I joined my last Autism blue mani in with a review polishes from Cate Ruby.
I got two awesome polishes from Cate Ruby to show you guys, but today i will be just showing you one - Silver Mesh.


How cute are is the bling around the neck?? It's an actual piece of jewellery but my stumpy fingers are too fat! It is stretchy but then it doesn't look nice. I think it can stay on the bottle lol


Silver Mesh is absolutely stunning! It's a polish that is meant to be layered over another colour. The glitter is was too sparse to be able to build up to anything that resembles opaque. The formula is awesome. Not too thin and not thick at all. This was one very thin coat, followed by two thin "dabbled" coats to give it a nice look. 


I layered Silver Mesh over Essence Hard to Resist.


How gorgeous are both of these together?!?!

Keep an eye out for my second review polish from Cate Ruby soon!

You can keep up to date with her on Facebook
Or
Find a stockist near you!


Cate Ruby polish provided for honest review. 


Kel xx

Monday, April 29, 2013

Aussie Nails Monday - Green

Hi everyone!

I skipped last weeks ANM but i am back this week with a Green mani.
This is my first post this month that doesn't contain blue (for Autism). I was feeling a little uninspired when i knew it was green this week. I'm not a huge lover of green polish (unless it's today's polish lol) and i don't have many in my stash.

I wanted to do some kind of nail art but when i attempted a tape mani i screwed it up..... so no nail art lol


Here's a swatch of China Glaze I'm with the Lifeguard!


I'm with the Lifeguard is a bright in ya face lime green neon with a beautiful green shimmer. WOWZA'S!!!! This has to be one of my favourite greens ever!! If you don't know already - I love neons! Oh my!! When i first got this back in January (when i was away on holidays) i couldn't wait to try it but it was so gloopy i had to wait until i got home to add some thinner to it. It looked like it had been tried a couple times =( which really sh*ts me! These are totally different than normal neons, they don't need a white base colour. This was opaque in three coats. 
I am really lemming the whole '12 Summer Neons collex now. I only have a couple because my heart belonged to the Poolside collex China Glaze did a couple years before, but these are truly wonderful!


Kel xx

Sunday, April 28, 2013

Born Pretty Store review #2 + 10% off coupon!

Hi everyone!

A while ago, i got asked by Daisy over at Born pretty Store to do a review. It went really well so she has asked me to review a couple more nail art products! Yay!! I chose these Nail Stickers for today's review.


They come in a big sheet with heaps of different designs. Today i chose to use the top left hand corner design.

It has all the instructions on the back but i didn't really follow them that closely. If you follow what i did, it'll be fine =)


You'll need a small cup of water, the design you want to use and scissors to cut said design from the sheet. There is a plastic film over the sheet which you can remove before cutting up into little nail sized pieces (but not before cutting the whole design from the full sheet, as you'll need the clear sheet to protect the rest while your not using them)

Cut these up before you paint your base colour on your nails. I have small nails at the moment and the design sheet that i cut out above was enough for all 10 nails. If you have really long nails you might have trouble fitting them for all 10 nails but it would still be great for accent nails etc.


~~~~~~~~~~~~~~~~~~~~~~~~~~~


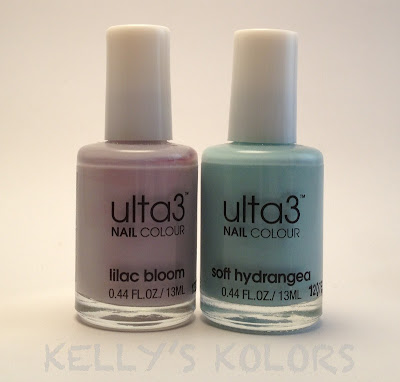
1) Start with painting your nails with your chosen colour(s). I used Ulta3 Lilac Bloom and Soft Hydrangea as my base colours for this nail art design.


 2) Dip one of the pieces of paper with the design on it, into the water for about 10 seconds.


 3) Pull it out of the water and quickly dip your nail into the water to get it a bit wet.

5) Pull your finger out and stick the paper, design side down, onto your nail. Try and get it into place straight away, it will take literally 2 seconds for the design to stick to your nail. Once it's on your nail you can't move it around, and if your not careful it'll end up like the below pic lol. If you do get it in place and your happy with it, you can gently blow on it to help it dry faster.
This was my first go.


......and like this one.
It takes a few go's to get used to it but it is simple as!! Don't worry about the bits hanging over the edges etc. We will clean them up later =)


6) Repeat for all nails. Don't worry too much about small wrinkles etc. once you put a top coat on i found the really small wrinkles are not noticeable.


7) Clean up by filing the free edge very gently by using small downward strokes (not across like when you file your nails)


8) You can either keep filing all the way around if your comfortable doing that (like above) or you can get out your acetone and a small brush and clean up around the edges. The design just melts away very easily!


9) Add a topcoat to seal it in and protect it. 
Notice the small wrinkles i had earlier are not visible now. Yay!


This wears just like normal nail polish would and doesn't chip etc any quicker than normal. I actually think it is quicker than getting your stamping kit out and if your like me, i can't get stamping right the first time. lol


The nail stickers can be bought from the Born Pretty Store for $4.73 per sheet which is cheap as, as it comes with so many different designs.

I also have a coupon code for all my readers, which gives you 10% off your entire order. They always have FREE shipping anywhere in the world!! =) Just enter the code "MLL91" into the coupon code area when you check out. 


Products in this post provided for review. 

Kel xx

Thursday, April 25, 2013

piCture pOlish - Cosmos!

Hi everyone!!
First of all, I just want to say i have had an overwhelming response to my collaboration shade "Ocean" with piCture pOlish! I have had nothing but great feedback and comments! It has all been positive and can't believe it has done so well so far! So THANK YOU! Thank you to those who have purchased it, who have commented on it, shared my photos, swatched it and just generally shared my excitement!

Because i have had such great response, and my 2 year blogiversary was on launch day, i will be having a giveaway of one bottle of Ocean (amongst other awesome things) in the coming days/week to say "Thank You!" So please keep an eye out for that. I will also announce it on Instagram too if you follow me there as well!


Onto tonights post!
In following the awesomeness of Ocean and to keep in with the Austim Awareness month i have been doing all month now, i decided to wear another pretty piCture pOlish shade...


Cosmos by Pshiiit Boutique!


Cosmos is an awesome dark blue jelly with a scattered holo. The same holo particles used in Ocean and the likes and the 600 series. This is a very awesome colour and is probably my favourite PP shade to date (after ocean of course =P ) This was two coats. It was easy to apply and i didn't actually even put on a top coat. It dried smooth and fairly shiny. The thing i love about these shades too lately is that they are so easy to remove and no foil method is required =)


Kel xx

Monday, April 22, 2013

PiCture POlish Ocean by Kelly's Kolors

Oh Emmm Gee! It's finally time! It couldn't have come on a better day than today, which is also my 2 year blogiversary!!! Yay! I can't believe it's been two years! I never would have thought i'd make it this long, let alone be able to bring you something truly amazing today!!

Alot of you who know piCture pOlish, and have been around the nail community and blogging world for a while, would remember mid last year about Blogfest 2012. I was a super duper lucky blogger who got given two shades to swatch and review. (which can be seen HERE)
Well, shortly after that, i was selected to collaborate with them to come up with a shade with my very own name on it! I couldn't believe my eyes when i read that i had been chosen. Me? Kellyskolors? omg, you serious? was a few things rolling around in my head on the drive home from work after reading the email.

A long 10 months later....... Ocean was born!


I knew exactly what i wanted and what i wanted it to be named when i found out i was selected. So, i chose my favourite colour which is Turquoise. This wasn't the exact colour i had in mind and i was a little disappointed when i first got my shade sample. It was a tad lighter than the colour today and it was quite sheer. I quickly came to the realisation that the colour i wanted (which was a lot lighter than this) would be too sheer because i wanted it to be jelly-ish, but i didn't want it to have to be layered over anything. I made one change to this shade and that was to make it more opaque. I got my second shade sample in the mail and i instantly fell in love with it! It didn't seem like a massive change but with it now being only 2-3 coats instead of 4 (and perhaps 5 if you don't like VNL and it bothered you that much) i was so much happier and realised it was the colour i loved all along.


Ocean has a Turquoise blue jelly base with large scattered holo flake particles to give that awesome holo effect (the same kind that is found in the Ozotic 600 series) The application of Ocean is awesome, which i was worried about as some PP polishes can be a little on the thick side. This was nothing like that. It went on smooth. I use three coats shown today. You can get away with two coats but depending on how thick your application of each coat is, you may get some visible nail line. Three coats will stop that. I then topped it off with a coat of quick dry top coat. 
Also, depending on what kind of light your in, it can lean a little Turquoise teal. I was so freakin' excited when i noticed that. It happens in dark low lit lighting. It can be seen somewhat in the second and third pic below.


The two pics below were taken on a different day when there was some actual sun about. This is to show the scattered holo effect in sunlight. 


Last shot is just a bit of fun yesterday afternoon in the rain. There was no sun about at all and trying to get some good shots was proving difficult.

So what do you think??


I want to thank the girls at piCture pOlish for making this possible! It was so fun to collaborate with you and come up with something truly awesome!! I can't wait to see what the other collaborators have come up with too!

This shade is available TODAY from the piCture pOlish  website for $12. Network members will have this shade available soon. Please check THIS page for network members in your area 
Ocean is a LIMITED EDITION shade.... for now. Please buy a bottle (or 5 lol) and help it to become a core line shade! =)

Please don't forget to check out piCture pOlish's facebook page for more swatches and to check out everyone else's shades! 

Kel xx

Thursday, April 18, 2013

Autism Awareness mani # lost count! Essence Grumpy!

Hi everyone!!
Just a quick one tonight.


I did this mani a couple of weeks ago when Autism month first started and have only now gotten around to blogging it now.


Essence Grumpy is a gorgeous dark blue. Application was awesome and applied in two easy coats. It was released in the Essence Snow White collection that Australia got at the beginning of December last year so it's pretty hard to find now. It is also know as a cheaper version of Nails Inc Baker Street.


Kel xx

Monday, April 15, 2013

ANM + AA - Blue Dotticure!

Hi all!

This weeks theme for Aussie nails Monday is Polka Dots!

Again, i wanted to keep in theme with this months Autism Awareness month so again my nails are all blue using only blue polishes.


I really like what i came up with as this was my first dotticure of this type.... not sure what it's "type" is but it's random dots to me lol

I started with three coats of OPI's What's with the Cat-itude from the Shrek collection. This colour is now HTF. I didn't see the hype of this blue (like seriously, it's just blue!!) to start with but i saw it on a blog sale for about $7 so i snatched it up pretty quickly along with Who the shrek are you? thinking maybe one day i'll actually use them and if not someone else will want them. Ohhh Emm Gee!! How wrong was i..... I was applying this this morning and it's beautiful!!! Absolutely stunning! I know i said it was just blue but look at it!! Much better colour on the nails then in the bottle!


I then grabbed my dotting tools and my palate and got dotting away in random areas and using the different sized dotters.
I used Ulta3 Blue Marlin, the dark blue creme
Color Club Over the Moon
Picture Polish Cosmos


What do you think?


Hope you have an awesome week!


Kel xx