I am back for my second year of blogfest and this one is quite different than previous years.
I got given three shades, and we have to come up with nail art which incorporates all three polishes, as well as doing a tutorial. Now, i am no good at doing tutorials, so sorry in advance!

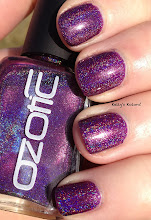
The three shades i got given were Atomic, Bombshell & Sea Jewel


I decided to go really simple and use striping tape for my mani.
This is the end result.

1) I started off with painting one nail, each a different colour. (You'll see my pinky in the picture is actually blue, but at the last minute i decided to change it to Atomic as it was just too much blue)
2 coats were needed for bombshell and Atomic, and 3 coats for Sea Jewel.


2) Wait for your mani to completely dry before starting on the next stage. I waited about 30 minutes but 10-15 minutes might be enough. I always like to make sure they are completely dry.
3) I cut about 14 pieces of striping tape, long enough to cover the nail and a bit more to pull it off from. I cut them all first and hung them off the side of my work bench until i was ready to use them. Always cut more than you need, it's cheap and it saves having to try and cut it later with wet nails.
4) Place striping tape in the position you desire. It can be a little tricky so have a little patience. Also using tweezers can help position it correctly too.


5) Once you have your tape in place, paint the whole nail with your chosen colour, I used 2 quick coats of bombshell over Atomic on the ring finger.

6) After the second coat, pull the tape off straight away so it doesn't dry into the polish and your design will have crisp lines.


7) Tar dar!! I used my clean up brush and a bit of acetone to clean up my cuticles.
It's best to do one nail at a time as you don't want the tape to dry into the polish and pull the polish up with it when you take it off.
8) Use your favourite fast dry top coat and your done!
I won't bore you with showing each nail i did, as it's the same process for the rest, but here is the finished result. (read: i forgot to take photos of the rest and only realised when editing that this was all i had *has a sad*)


I hope you enjoy my blogfest mani! Please check out everyone else that is participating. Links to some below in the inlinkz area. You can also check out Picture polish on the below social media sites where they will be showing everyones mani's.
I had fun with these polishes and i love all three! Two of which i never thought i'd buy but i'm glad i got.
Thank you Picture Polish for letting me be involved!
Shades in the post were provided for review.
Have a great week everyone!!
Kel xx


Looks great - I love the colours
ReplyDeleteExcellent job, your lines are so crisp! Why can't I get them to look this good waaah ;)
ReplyDeleteThis looks fantastic. Well done
ReplyDeleteI really like what you did with them! Also Sea Jewel = <3
ReplyDeleteSimple and pretty!
ReplyDeleteI really like this - definitely have to whip out the striping tape more often!
ReplyDeleteThese colors look great together! Love that blue!
ReplyDeleteOoooh I love these colors together...such a crisp manicure!
ReplyDeleteLooks great and so neat xx
ReplyDeleteGorgeous mani and love the striping, looks great :)
ReplyDeleteSimple but very pretty!
ReplyDeleteLove these colours together and your stripes are so sharp! Also yaaay for sparkles haha.
ReplyDeleteLooks gorgeous!!
ReplyDeleteHi! Excuse me for any mistakes in this post, I'm French. ;) Your nail art is very original, you're creative, and your blog is beautiful, I love it!
ReplyDeleteGood luck for your blog,
Piiiou.